This page may contain affiliate links; you can read our full disclosure.
A good camping survival kit isn’t about building some oversized, tactical-looking brick stuffed with gear you’ll never use. It’s about assembling the things that genuinely matter when something goes sideways — the tools that keep you warm, hydrated, oriented, patched up, and able to move toward safety. A DIY kit gives you more control than store-bought survival packs, which usually come overloaded with gimmicks and short on the stuff that actually helps.
Putting one together isn’t complicated. It’s just thoughtful. And the best part is that once you build it properly, you can use the contents on any outdoor trip: camping, backpacking, road trips, hunting, whatever. A survival kit is basically insurance you carry in your pack — small enough not to notice, important enough to matter the moment things stop going according to plan.
Here’s how to build a DIY kit that stays lightweight, practical, and genuinely useful outdoors.
Start With Fire — Your Most Important Tool
When things get rough outdoors, warmth trumps almost everything else. Being able to start a fire when you’re cold, wet, stressed, or dealing with bad weather is the difference between a minor inconvenience and a serious problem.
A proper survival kit includes at least two ways to start a fire — one primary, one backup. A windproof lighter is the easiest option because it keeps working when your hands are cold, but matches stored in a waterproof container are worth carrying too. If both fail, having a small fire starter block or ferro rod means you still have a path to flame.
Fire gives you heat, comfort, the ability to signal, and the power to boil water. Without it, everything gets harder. That’s why good kits always include redundancies for fire starting.
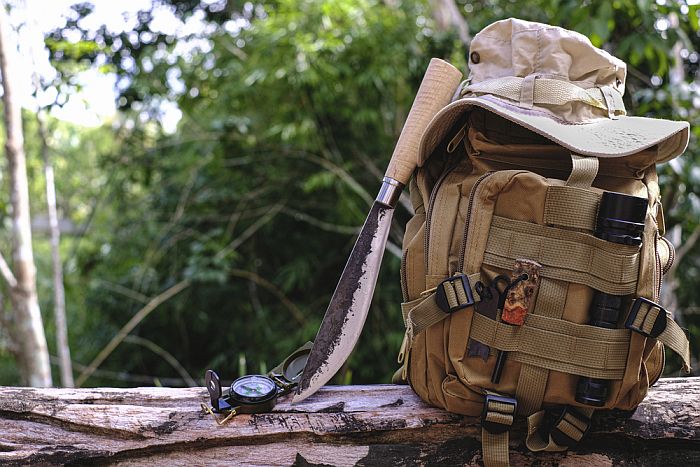
A Knife Is Non-Negotiable
You don’t need a giant Rambo blade strapped to your leg. A compact, sharp folding knife or lightweight fixed blade is one of the most versatile survival tools you can carry. It cuts cordage, helps process firewood, sharpens sticks, trims fabric, prepares food, and serves as an all-purpose problem solver.
A dull knife is dangerous, and a cheap one fails when you’re using it the most. A good blade doesn’t have to be fancy, but it does have to be reliable. Keep it sharp, keep it clean, and keep it in your kit — you don’t want to be improvising cutting tools in the middle of the woods.
Add Water Tools — Because Thirst Sneaks Up Fast
Hydration is where most survival situations unravel. You can go longer without food than you think, but not without water. A DIY kit needs two pieces: a way to collect water and a way to purify it.
A lightweight metal cup or small titanium pot does the collecting and boiling. Boiling remains the simplest and most reliable purification method on the planet. If you can boil it, you can drink it.
Gravity water purifiers are extremely useful because they do the work for you. Pour questionable water in the top and let gravity pull it through the filter into a clean reservoir. No pumping. No squeezing. No fuss. For emergencies, it’s one of the easiest and safest ways to get drinkable water with minimal effort — especially if you’re tired, cold, or short on fuel.
Even in DIY kits, having one good water solution that works under stress is worth its weight.
Basic First Aid — Just the Essentials
You don’t need a full medical bag, just the basics that stop bleeding, stabilize minor injuries, and reduce infection risk. A few bandages, antiseptic wipes, medical tape, blister treatments, and a small strip of antibiotic ointment go a long way. Injuries outdoors tend to be simple — cuts, scrapes, burns, twisted ankles — and being able to treat them fast prevents bigger problems later.
Your first aid kit doesn’t have to be big. It just has to be smart.
Phones are fantastic — until the battery hits zero or the cold kills your charge. A survival kit should always include a small compass and a paper map of the area you’re exploring. Even a basic compass turns a confusing situation into a manageable one. Modern navigation apps spoil people, but when tech dies, simple analog tools keep you calm.
Knowing the general direction of your campsite, your vehicle, or a nearby road can turn a stressful moment back into a safe one.
Cordage — The Simplest Tool With the Most Uses
A small bundle of paracord or bank line is one of the most versatile survival items in existence. It sets up tarps, repairs gear, ties down tents, creates splints, hangs food bags, fixes backpacks, bundles firewood, and solves problems you didn’t know you’d have yet.
Cordage weighs almost nothing and turns bad situations into manageable ones. It’s one of the easiest DIY survival kit items to include, and one you’ll use constantly.
Emergency Warmth and Shelter
Even if you already have a tent, your survival kit should include a backup shelter option — something compact and fast. An emergency bivy sack is one of the best choices because it reflects heat and protects against wind and rain. Campers often underestimate how quickly weather can change or how cold you can get if you ever end up separated from your main gear.
An emergency bivy plus the fire tools you already packed covers the two biggest threats in the outdoors: cold and exposure.
A Reliable Light Source
A small flashlight or headlamp belongs in every survival kit. Darkness isn’t just inconvenient — it makes navigation harder, increases injury risks, and raises stress levels. Even a compact LED light with fresh batteries can keep you moving safely after the sun disappears.
Consider a rugged, rechargeable camp flashlight designed to run for hours on a single charge. Some of these lights also double as power banks, giving you a way to top off your phone in an emergency. Having a dependable light source that doesn’t flicker, drain instantly, or quit in bad weather is an actual game-changer in real outdoor scenarios.
Put one in your kit, forget about it, and trust that it’ll be ready when you need it.
Don’t Forget the Miscellaneous Lifesavers
A few tiny items round out the kit without adding much weight. A mini lighter. A small roll of tape. Safety pins. A signal mirror if you’re traveling remote. A whistle. These aren’t glamorous pieces of gear, but they solve problems that come out of nowhere.
A good DIY survival kit isn’t about collecting “cool” items. It’s about making sure that no matter where you are or what goes sideways, you aren’t relying on luck to get through it.
Pack It in a Simple Pouch and Keep It Accessible
A survival kit belongs in a pouch that opens easily, organizes your tools, and lives somewhere accessible — not buried at the bottom of your bag under five pounds of snacks and forgotten clothing. If something happens, you want to reach for it instantly.
Think of it like your outdoor insurance policy: you hope you never need it, but you want it instantly usable if you do.
Final Thoughts
A DIY camping survival kit isn’t complicated, tactical, or dramatic. It’s a compact collection of tools that keep you warm, hydrated, oriented, and prepared for unexpected situations outdoors. Fire starters, a good knife, water tools, first aid basics, navigation gear, cordage, and a simple shelter setup form the backbone of a kit you can count on.
Upgrades like a gravity purifier or a rugged rechargeable flashlight make the system even stronger — but the heart of a great survival kit is your own preparation, not your wallet. Build it carefully, store it where you can reach it, and carry it with the confidence that you’re not stepping into the outdoors unprepared.
When everything goes right, your kit stays zipped. When something goes wrong, you’ll be glad you built it yourself.
