A moldy tent isn’t just ugly — it weakens the fabric, destroys waterproof coatings, ruins zippers, and eventually turns a perfectly good shelter into a musty biohazard you never want to unzip again. Mold thrives anywhere moisture, darkness, and warm air team up, which makes tents a perfect target after rainy trips, humid storage areas, or even just being packed away too soon.
This page may contain affiliate links; you can read our full disclosure.
If you camp long enough, mold becomes a rite of passage. But with the right cleaning method and some smart prevention habits, you can keep your tent in good shape for years.
Step One: Understand the Type of Mold You’re Dealing With
Not all mold on a tent looks the same. Sometimes it appears as small black specks (classic mildew). Other times it shows up as white fuzz, green blotches, or a general musty odor with no obvious spots at all. Each type responds to cleaning a little differently, but they all follow the same rule: the longer they sit, the harder they are to remove and the more damage they cause.
The good news is most tent mold can be cleaned safely without harsh chemicals. The trick is using the right cleaning agents, patience, and a gentle approach that won’t damage the waterproof coating.
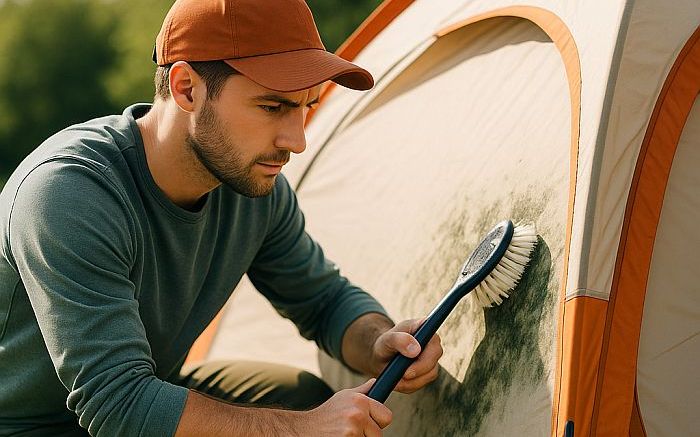
Step Two: Start With a Soft Brush and a Shade-Covered Work Area
Always clean a tent in the shade because sunlight breaks down waterproof coatings while you’re scrubbing. Lay the tent out flat, grab a soft brush or sponge, and remove as much surface mold as possible. Never use hard-bristle brushes — they can strip the polyurethane coating or tear the fabric.
You’re just loosening debris at this stage. The real work comes with a proper cleaning solution.
Step Three: Use the Right Cleaning Solution (Not Bleach)
Bleach is the worst thing you can use on a tent. Even diluted, bleach destroys nylon fibers and eats waterproof coatings. Some people online swear by it, but those are the same people replacing tents every season without understanding why.
Instead, use one of these three safe cleaning options:
Mild Dish Soap Solution
A bucket of warm water and a small amount of mild soap is often enough for light mildew. It’s gentle, effective, and won’t damage coatings.
White Vinegar Solution
A mix of vinegar and water (usually 1:1) kills a broad range of mold types and deodorizes without harming the tent. It may take a couple of rounds for stubborn mold, but it works.
Enzyme-Based Tent Cleaners
Outdoor brands make specialized cleaners designed for mold, mildew, and gear-safe washing. These are ideal for severe cases and won’t break down waterproofing.
Whichever solution you use, gently scrub the affected areas and let the mixture sit for 10–15 minutes before rinsing.
Step Four: Rinse Thoroughly and Dry Completely
Rinse the tent with clean water until every bit of soap or cleaning solution is gone. Leftover cleaning residue can attract dirt and weaken waterproof coatings over time. After rinsing, shake out excess water and hang the tent or spread it in a breezy, shaded area to dry.
This step is non-negotiable:
If the tent isn’t 100% dry before storage, you’ll be dealing with mold again.
Even slight dampness in seams or folded corners can cause fresh growth within weeks.
Step Five: Treat Lingering Odors or Stains
Sometimes mold leaves behind a faint smell or stain even after the growth has been removed. This doesn’t mean the tent is unsafe — it just means the fabric was stained. To reduce odors, sprinkle baking soda inside the tent once it’s dry, let it sit for a few hours, then shake or vacuum it out. You can also set the tent outside on a dry, breezy day to air out naturally.
If stains remain, that’s usually cosmetic. As long as you’ve killed the mold and the fabric is stable, the tent will still perform normally.
Step Six: Reapply Waterproofing
Any deep cleaning — especially one involving scrubbing — can strip some of the tent’s DWR (durable water repellent) coating. Once the tent is fully dry, spray the rainfly and outer walls with a fabric-safe waterproofing treatment. These sprays restore beading, improve water resistance, and extend the life of the tent’s coating.
This step turns your mold-cleaning day into a performance tune-up. The tent ends up better protected than before.
How to Prevent Tent Mold in the Future
Once you’ve cleaned a moldy tent, you’ll never want to deal with it again. Prevention is way easier than remediation — you just need to follow a few simple habits.
Never Pack a Wet or Damp Tent
A tent doesn’t need to be soaked to grow mold. Even dew, condensation, or a bit of moisture trapped in the corners is enough. Always let your tent dry fully before packing it. If you must leave a site early and pack it damp, set it up again at home the same day and let it fully dry indoors or outdoors.
Leaving a tent in a car trunk for three days after a rainy weekend is the #1 cause of mold.
Store Your Tent Loosely, Not Compressed
Tent bags are designed for travel — not storage. Keeping a tent compressed long-term traps moisture, flattens insulation layers, and encourages mold. Once the tent is dry, store it in a breathable mesh bag or a pillowcase in a dry area.
Skipping this one rule alone extends the life of your tent dramatically.
Air Out Your Tent Periodically
If your tent stays in storage for months at a time, take it out occasionally and let it air for an afternoon. This reduces stale odors, allows hidden moisture to evaporate, and prevents mold from establishing colonies in dark, folded fabric.
It’s the cheapest insurance policy you’ll ever give a piece of gear.
Sweep Your Tent Before Packing It
Dust, soil, leaves, grass, and organic debris carry moisture. When trapped in a folded tent, they accelerate mold growth. A quick sweep with a hand broom or towel keeps organic material out of your storage bag and reduces mold risk.
Clean tent = dry tent = long-lasting tent.
Be Careful Where You Dry Your Tent
Drying a tent in direct sunlight feels fast and convenient, but UV rays degrade nylon quickly. You’ll trade mold prevention for weakened fabric. The ideal drying setup is shade, airflow, and time.
If you must use sun, keep exposure short and rotate the tent often.
Consider Using a Groundsheet or Footprint
Moisture from the soil can seep into the tent floor even if it doesn’t feel wet. Over multiple trips, this adds up and encourages mold. A footprint or tarp reduces moisture transfer and keeps the bottom of your tent cleaner — making mold less likely to appear in hidden folds.
What to Do If Mold Won’t Come Off
Some mold digs deep into the fibers and won’t disappear completely. If the fabric is weakened, flaking, or the waterproof coating is deteriorating, the tent may be at the end of its lifespan. But most tents with moderate mold can be salvaged. The goal is to stop the mold, not necessarily erase every stain.
If the structural integrity is intact and the smell is gone, a few stains are cosmetic, not functional.
When It’s Time to Replace a Moldy Tent
Even well-cleaned tents eventually wear out. Replace a tent if:
- the waterproofing no longer holds even after treatments
- the fabric delaminates or flakes
- seams peel away from the coating
- mold smell returns immediately after cleaning
- the floor becomes soft or sticky
At that point, the tent is telling you it’s done.
The Bottom Line
Mold is one of the fastest ways to ruin a tent, but it’s also one of the easiest problems to prevent. A little cleaning knowledge, proper drying habits, and smart storage go a long way. If mold does show up, gentle cleaning solutions, patient scrubbing, and complete drying will usually restore the tent to safe, usable condition.
Maintain your tent well, keep it dry, store it loosely, and you’ll avoid ever unrolling a musty surprise again.