This page may contain affiliate links; you can read our full disclosure.
A sharp axe is one of the most important tools you can bring into the woods. A dull one is dangerous, frustrating, and turns simple chores into arm-destroying workouts. The good news? You don’t need a fancy workshop or a $200 grinder to fix it. A simple, sturdy mill file is all you need to bring an axe edge back to life.
This guide walks you through how to sharpen an axe with a file the right way — safely, efficiently, and without chewing up your blade.
Why Use a File Instead of a Grinder?
If you want full control and zero risk of overheating the edge, a file is the best tool for the job. Grinders remove metal too fast and can burn the temper out of the steel, leaving you with a brittle edge that chips easily.
A file gives you:
- Slow, controlled metal removal
- A predictable, consistent bevel
- No sparks, overheating, or ruined edges
- The ability to sharpen anywhere — garage, backyard, or campsite
Files are inexpensive and last forever if you take care of them.
What You Need
You don’t need much:
- A 10–12 inch mill file (single-cut or double-cut)
- A clamp, vise, or another way to secure the axe head
- Gloves for grip and safety
- A honing stone or axe puck (optional)
- Light oil or WD-40 (optional, for rust protection)
Step 1: Secure the Axe Properly
Never sharpen an axe while it’s wobbling around like a drunk raccoon. You want the axe head rock-solid and unable to move.
- Clamp the axe head in a vise with the edge facing up
- Or lay the axe on a stump, kneel on the handle, and stabilize the head
The safer and more stable your setup, the better your results.
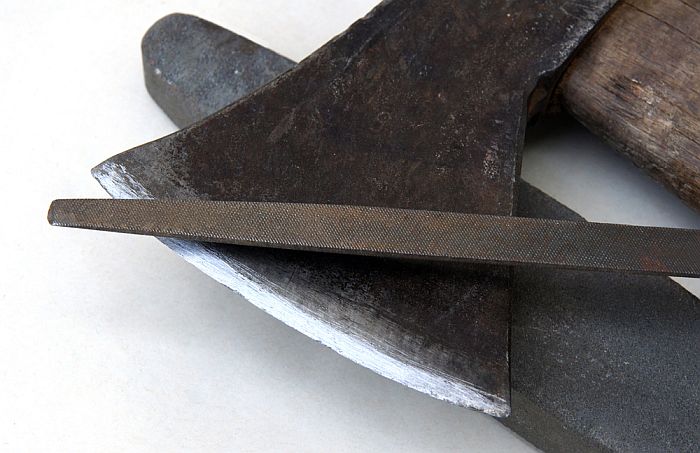
Step 2: Find the Original Bevel Angle
Most axes are ground to roughly a 25–30 degree angle. Your goal is not to reinvent the edge — follow the factory bevel.
Hold the file so it sits flush on the bevel and keep that angle consistent. Inconsistent angles create weak, uneven edges.
Step 3: File in One Direction Only
This is the golden rule.
A file cuts in one direction. Don’t saw back and forth like you’re slicing firewood.
Proper file stroke:
- Push the file away from you
- Lift it off the steel on the return stroke
- Apply steady, even pressure
Long, smooth strokes produce the straightest, sharpest edge.
Step 4: Work From Heel to Toe
Start at the base of the edge (the heel) and work toward the tip (the toe), moving evenly across the blade.
Watch for:
- A consistent shiny strip forming along the edge
- No high or low spots
- Even metal removal across the bevel
If one side is noticeably thicker, slow down and maintain your angle. Symmetry matters.
Step 5: Flip and Repeat
Sharpen the other side the same way. Most axes have symmetrical bevels, so whatever you do to one side, do to the other.
Once both sides are even, carefully run your finger perpendicular to the edge. You should feel a slight burr — that means you’ve reached the edge apex.
No burr means it’s not sharp yet. Keep filing.
Step 6: Optional — Hone the Edge
A file gives you a solid working edge. Honing refines it.
You can use:
- An axe puck
- A sharpening stone
- Sandpaper in a pinch
Use light, circular motions on both sides to remove the burr and smooth the edge.
This step isn’t required — but it turns a good edge into a great one.
Step 7: Oil and Store the Axe
After sharpening:
- Wipe the blade clean
- Apply a thin coat of oil to prevent rust
- Check the handle and head for cracks or looseness
A sharp axe is a safety tool. Dull edges glance, bounce, and slip. Sharp edges cut clean and predictably.
Safety Tips
- Never file toward yourself
- Always secure the axe before working
- Keep fingers clear of the edge
- Don’t over-sharpen — axes need durability
- Work slowly and check progress often
An axe should be sharp enough to bite into wood, not razor-thin like a kitchen knife. Too thin and the edge will roll or chip.
Final Thoughts
Sharpening an axe with a file is simple, old-school, and incredibly effective. Once you know the technique, you can maintain your axe anywhere — at home, at camp, or deep in the woods.
A sharp axe means cleaner cuts, safer swings, and less frustration. Ten minutes with a file saves you an hour of fighting wood later.
